
BMW M3. Ford 5.0 engine. T5 transmission. All of the major players were ready, now it was time to get that lump of outdated, underpowered, worn out American cast iron ready to shove into place.
Fünf Null Part VI: Replacement Engine Acquisition –or- “More Bad Decisions”
Fortunately, I’m not the first person to put an Explorer engine into an E36 BMW, so I was able to do some research and get some advice from someone who has already been there, like getting makeout tips from your older cousin who has made out with…like…four chicks. Except less creepy and not quite as vaguely homoerotic.
Advertisement
This thread on BimmmerForums outlines what’s needed to get an Explorer engine to work and also includes a smattering of incorrect information like you’d expect from any internet forum. I was able to put on my online-forum-waders and navigate that stream of disinformation to snatch out the wriggling bits of information I needed, then hold the bit of information by its head, scrape off its scales, insert my knife into its anus near its tail, then cut towards its head, extracting the relevant information and discarding the leavings.
Step 1: Replace the oil pan. The stock Explorer engine comes with a beautiful, lightweight cast aluminum oil pan.
Sponsored
…that’s too low for the E36’s front subframe and steering rack. So I replaced it with a cheap pan and pickup from Summit.
And while I was in there I took at look at the cylinders to see what kind of shape they were in.
It’s hard to get a good picture given a smartphone camera that wants to focus on anything but the thing I want it to focus on, but you can see the decent crosshatching still on the cylinder walls. Everything rotated freely and there was no oil sludge or buildup anywhere.
With the bottom end put together, I decided to build an engine stand that would let me easily roll the engine around without fear of the thing snapping apart and crushing my leg, foot, or son (as the Harbor Freight stand threatened to do after reading the joke a couple posts back).
Advertisement
Including the bellhousing on the stand allowed me to mount the flywheel and starter so that the engine could be cranked over.
To really monitor the health of the engine, I wanted to be able to measure a couple of running parameters, so I replaced the stock oil pressure switch with this AEM 0-100psi sensor. The stock Ford oil pressure sender is 1/4-NPT and the new sensor (like most aftermarket sensors/senders) is 1/8-NPT, so I grabbed a 1/4-NPT male to 1/8-NPT female adapter from a local home improvement store.
And I placed an identical sensor in the fuel rail to monitor fuel pressure. The fitting size into the stock Ford fuel rail was hard to determine and I ended up buying the wrong adapter once or twice before I finally figured out that it’s 1/16-NPT, so I scoured the internet and finally managed to find 1/16-NPT male to 1/8-NPT female adapter.
The other big modification I performed (and I may be getting ahead of myself here) is the addition of LS ignition coils enabling me to run true sequential ignition in a coil-near-plug setup. I grabbed a set of LS truck coils complete with brackets and pigtails for $100 from eBay and got busy mocking them up on the engine.
Then I welded some nuts onto the valve covers so that I could secure the brackets in place.
Note the 5/8″ brass cap on the former EGR port.
I watched a few YouTube videos of people in Explorer 5.0s doing 0-60 runs. I both love and hate that these kind of things exist – on one hand, it was a useful resource for me to really prepare myself to be underwhelmed, but on the other hand, the existence of type of people that would not only do, but also videotape and put on YouTube, a 0-60 run in an old Explorer makes me nervous for the future of society.
But the important info that I gathered from the videos is that the Explorer, at full throttle, shifts at a mind-boggling, reality-bending, Earth’s-rotation-altering 4800rpm. So I was going to need new valve springs if I was ever going to be so bold as to sneak the engine over 5000rpm.
And since the valve covers were off, why not clean them up a bit and add a bit of visual horsepower?
Then I did a little port matching on the intake to mate it to a new 75mm throttle body, oriented for maximum hood clearance.
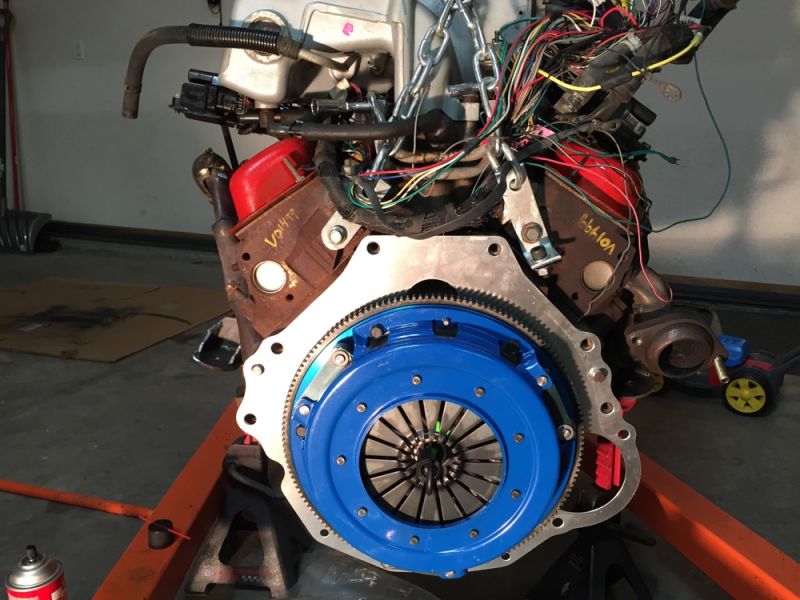
Because the Explorer came with an automatic transmission, I had to get a pilot bearing to fit the crank and accept the T5 input shaft, which was pretty easy to pound in place. I grabbed an FX Racing Stage 2 clutch and aluminum flywheel (look for a future post detailing why you should NEVER buy this jun) and bolted those in place, then shoved the transmission where the sun don’t shine.
I promise I cleaned the flywheel surface before putting them together.
With all of that reassembled and the car ready, it was time to shove it in there and smash everything with a hammer until it fit, or as I like to call it “Wednesday night.”
Catch my build thread here on Oppo with a new installment each Monday (even on holidays, apparently), or if you like spoilers check out MikaelVroom.com for the latest updates. Twitter me @MikaelVroom, Instagram me @MikaelVroom. I’m trying to cut back on pictures of me frolicking in front of a brick wall.