After flying to Germany and spending over a month preparing a $600 diesel Chrysler Voyager for the country’s daunting TÜV inspection, I was confident. I’d replaced, fixed and adjusted dozens of faulty parts. With trained mechanics advising me, I was certain things would go swimmingly at the inspection center. But oh was I wrong. Here’s what happened when I took a 250,000-mile Chrysler minivan that I’d bought sight unseen through one of the toughest mandatory vehicle inspections on earth.
It’s been nearly a year since I hatched a harebrained scheme with my German friend Andreas after I’d noticed how unbelievably cheap diesel Chrysler minivans are in the country (due in large part to diesel restrictions in inner cities). With family in Bavaria, a strong affinity for diesel cars with manual transmissions, a deep love of old Chrysler vans (My dad drove me home from the hospital after my birth in a blue manual 1990 Plymouth Voyager) and an insatiable appetite for travel, I felt I had no choice but to buy one of these cheap Chrysler Voyagers, convert it into a mobile apartment and take it on a ridiculously long road trip through Europe. To not do so seemed almost foolish.
My friend Andreas bought the blue vehicle you see in the video above from Lichtenfels, about an hour north of Nürnberg, for 500 euros, and his girlfriend Josie’s parents were kind enough to store it for me for a few months until I could feast my eyes on the glorious machine. That eye-feasting happened in early August, but — due in large part to a scarcity of parts in Germany for this American engineered but Austria-built machine — it took until mid-September for me to have the van ready for inspection.
I’d replaced suspension, steering and brake parts. I’d fixed and adjusted headlights. I’d sanded and painted rusty underbody parts. I’d installed new tires and rubber bushings (here’s an exhaustive list of everything I fixed ). After more than 45 days, with hundreds of euros spent and with friends at my side who are trained German mechanics I was certain I would pass.
But somehow, even after having heard so many horror stories, I’d underestimated Germany’s TÜV. Because I didn’t pass. Not by a long shot.

An Introduction To Germany’s TÜV Inspection

Before we get into the tragic events that unfolded when my cheap van dared to show its face at a TÜV garage, you’re going to want to understand how German inspection works.
In Germany, any car more than three years old must — every two years — undergo a Hauptuntersuchung, or General Inspection, by one of several designated inspection authorities. The most popular companies involved in Hauptuntersuchungs are TÜV Nord, TÜV Süd, TÜV Rheinland, Dekra, GTÜ, and KÜS, though — regardless of which inspection house they take their vehicle to — most Germans simply refer to their vehicle inspection as the “TÜV.”
A Bit Of History
TÜV stands for Technischer Überwachungs-Verein, which translates to technical inspection association. It’s a concept with a history dating back to 1865, when a boiler in a brewery in Mannheim exploded. This brought about voluntary boiler inspections, which, over time, eventually blossomed into today’s vehicle inspections. Those have become so notorious for taking cars off the road that many German cars sport bumper stickers that read “[My car and I] are staying together until the TÜV does us part.”
Yes, in what has to be the stereotypical thing you’ve read all day, Germany’s car inspection program came about because of beer. TÜV Saarland describes its brewery explosion-related history further on its website:
20 boiler owners in Baden joined in with the plans and eventually, on 6 January 1866, in the premises of the Mannheim Stock Exchange, they formed a company for the inspection and insurance of steam boilers. This was the first Inspection Association on the European mainland. Other German states and regions followed this example.
…Because they were so successful in preventing accidents, they were later tasked with safety tests in other technical areas, including the regular testing of commercial vehicles and driving tests.
Even though most folks think only of car inspections when they hear “TÜV,” TÜV organizations actually conduct quality-control on all sorts of goods and services in a variety of industries in Germany, as the Goethe Institute (an organization that promotes German culture) points out:
TÜV testers are now underway at power plants, in ships and at wind turbines, in offices and medical practices and at factories for the manufacture of children’s toys. And TÜV now also tests the services of companies. In 2014, the certificate “Service tested” of TÜV Saarland came under fire. It is a seal of approval that banks, travel agents, estate agents, car dealers and Internet portals can be awarded on the basis of a customer survey.
Germans love to inspect things.
TÜV Is Required By Law
As for the general vehicle inspection that is the primary subject of this article, which became a requirement in 1951, ADAC (the German equivalent of AAA) writes on its website. The organization highlights the TÜV vehicle inspection’s primary objective, writing:
It is intended to ensure that no unsuitable or non-compliant motor vehicle is used on the road. It is defined as a “disassembly-free visual, functional and effectiveness test of certain components”, during which the vehicle is assessed for compliance with the StVZO
“Disassembly-free.” This means that everything — wheels, brake drums, engine parts — stays in place, and inspectors assess the vehicle’s condition from the outside. They run tests to check not just that key vehicle safety features function, but that they function sufficiently (more on that later).
TÜV inspections are required by the German government. You’ll notice that the quoted block above ends with “StVZO.” This stands for Straßenverkehrs-Zulassungs-Ordnung, which translates to Roadway Traffic Licensing Regulation. Specifically, TÜV Saarland writes, the general inspection checks to make sure cars comply with section 29 of that Federal regulation, which you can read here. Here’s a look at some excerpts from that document.
These describe the inspection sticker that all cars must have on their license plates, and the last quote in this group talks about how owners have a month from when they fail TÜV (something that will become relevant to me, as you’ll see a few paragraphs down) to get their car fixed:
The owners…have their vehicles at their own expense… examined at regular intervals.
[…]
Inspection badges are to be allocated by the authority responsible under state law or by the persons authorized to carry out main inspections and affixed to the rear official number plate permanently and secured against misuse
[…]
The inspection sticker and the inspection mark…validity is extended by one month if defects are found during the general inspection or safety inspection that must be remedied before a new inspection sticker or inspection label is issued.
These excerpts talk about how owners have to keep a copy of the inspection report generated by the TÜV authority (I’ll show my report here in a bit):
(9) The person responsible for carrying out general inspections or safety inspections must prepare an investigation report for main inspections and a test protocol for safety inspections in accordance with Annex VIII and hand them over to the vehicle owner or his representative.
(10) The holder must keep the inspection report at least until the next main inspection and the test report at least until the next safety inspection…
Let’s have a look at what such an inspection report contains.
How TÜV Works
Okay, so let’s delve into what exactly a TÜV inspection involves. It should be no surprise that — given Germany’s speed limitless autobahn that should probably not be traversed at 100 mph in a vehicle with even moderate flaws, and the country’s general affinity for rules and order (yes, this is a stereotype, but it’s mostly true) — the inspections are strict and thorough.
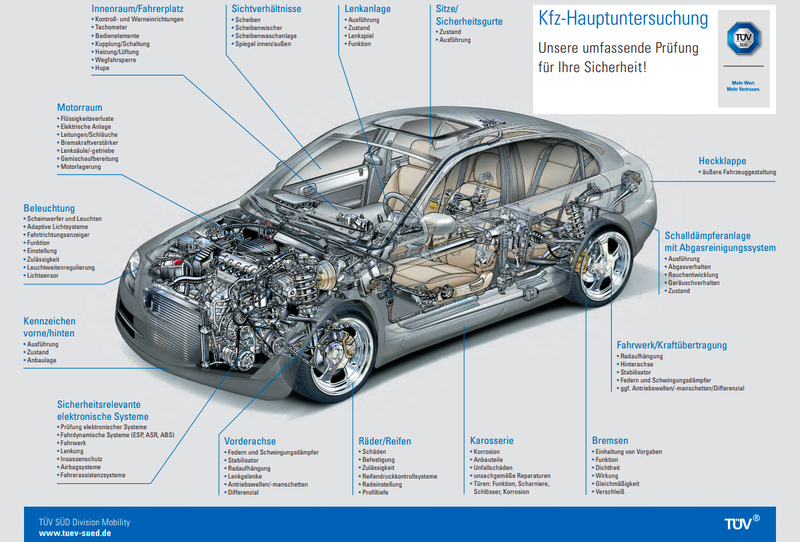
The image above from the inspector TÜV SÜD shows the Prüfpunkte, or checkpoints. They include the front axle, wheels and tires, body, brakes, lights, engine bay, various parts of the interior and much, much more.
I won’t go through all the components that inspectors look at as they meticulously comb through a vehicle, but I will break down the TÜV’s five main checks: exterior visual inspection, interior visual inspection, technical hardware functionality test, emissions test and vehicle modification compliance check.
Exterior

As mentioned, TÜV inspections involve no vehicle disassembly whatsoever. Cars go up on a hoist, and technicians poke around under the vehicle and underhood, checking for various faults.
Techs look for sharp edges or rust holes (no rust holes are allowed on the exterior of the car at all — zero. This, as I understand, is to prevent pedestrian injury if they brush up against the car) in the body. They search to make sure tire tread depth is sufficient and that the tires aren’t too old and have no dry rot. Inspectors also check to see that the tire size is the same as what’s recommended by the manufacturer (I’ll discuss car modifications in a moment).

TÜV technicians look for leaks in shock absorbers, power steering pumps, the engine, the transmission, the differential, the cooling system and more. They check rubber parts for tears or cracks — parts such as hoses, CV joint boots, motor mounts and suspension bushings. Any leaks more than just “seeps” and any significant holes in CV boots are grounds for a failure. (I’ll get into the different kinds of failures in a moment).
Inspectors also check the wheels for damage, make sure the door latches all work, check the exhaust for any damage and to ensure that it’s held securely to the car, and they do a headlight test.
Technical Hardware Functionality


In addition to the visual inspection for rust, leaks, and worn out suspension and steering parts, the TÜV involves actually testing a vehicle’s functionality.
The headlight test involves rolling a special contraption in front of each light, setting the machine to the “percent downward inclination” specified by the vehicle manufacturer and ensuring that not only is each light bright enough but also that it is aimed to follow a grid indicator located inside the test machine, and that the car’s beam pattern and color is appropriate.

Then there’s the brake test. This involves driving a car onto a set of rollers built into the workshop’s floor, as shown above. These rollers act as a dynamometer, measuring how much force a car’s brakes can generate, in kilonewtons. The display below shows realtime brake force generated by the left and right wheels. In order to pass inspection, the wheels on each axle must not only produce sufficient braking force (the goal force is a function of the vehicle’s gross combined weight rating), but they must demonstrate sufficient Gleichmäsichkeit, or balance.
Specifically, a brake on a given axle must produce a maximum stopping force no less than 25 percentdifferent than the stopping force generated by the other wheel on that axle.

The parking brake, too, undergoes the test on the rollers. With the parking brake engaged the rear wheels must produce sufficient stopping power and their maximum braking forces in kilonewtons must be within 50 percent of one another.

Another test is the front suspension check. It involves driving the vehicle up onto sliding platforms, which subject the front suspension to steering input and lateral loads, allowing inspectors to check for play in bushings, tie rod ends, ball joints, and wheel bearings.
Interior

On the interior, inspectors check the steering wheel lock functionality and the odometer reading. They look to see that the turn signals (and all other lights) are working. They look for Check Engine lights, inspect seatbelts, make sure the heater works and ensure that the vehicle is outfitted with a sufficient and up-to-date Notfallausrüstung. (Not having the last one probably won’t cause you to fail TÜV, but you should know about it. It is a safety kit that is mandatory for all vehicles in Germany; the kit includes a high-visibility vest for each passenger, a safety triangle and a first aid kit).
Emissions

The emissions test involves shoving a sniffer into a tailpipe, revving the engine to the sky and measuring the carbon monoxide readings via a computer that has the engine speed as an input. The readings are scored against acceptable CO outputs for that vehicle — figures that the testing center has in its database. I’ll keep this section fairly vague, as emissions would prove to be no issue for my van.
Update: It’s worth noting that CO readings only apply to gasoline vehicles (TÜV also tests air:fuel ratios at certain engine speeds for gas cars). Diesel vehicles just receive a particulate matter test involving measuring exhaust opacity.

Vehicle Modifications

The last section I’ll discuss is vehicle modifications because it is fascinating. In the U.S., if you want to install an aftermarket part on your car, it’s usually no problem. Hell, if you want to bolt in a big-ass junkyard turbocharger or build your own suspension with scrap steel and a cheap welder, you can absolutely do that (with restrictions on altering pollution control devices in many states, of course). But in Germany, modifying cars is extremely difficult.
My friend Andreas’s Toyota MR2 (shown above and below), for example, nearly failed TÜV because his front tires are 10 millimeters wider than stock. “These front tires aren’t the factory size; this is verboten!” the German law states. Andreas was able to get by, but his reasoning just displays how absurdly strict TÜV really is. From Andreas:
I needed a certificate from the tire manufacturer that the tires are suitable for the weight of the car and for the rim size, then [TÜV] needed a document that this size combination front&rear won’t [mess] up the ABS and other systems (which they thankfully found in their database because I didn’t know I’d need that) and then they thrashed the car around to see if they could get it rubbing.

My friend Tobi’s car is a JDM Subaru Legacy with aftermarket wheels and suspension components. In order to drive this legally, major aftermarket parts to have been approved by the German KBA (the federal motor transport authority, which has validated the parts for safety) and the parts must be listed on the car’s vehicle registration that must be kept in the car at all times.
During each general inspection, TÜV technicians must ensure that the part numbers of aftermarket components match up with the numbers in the vehicle registration. There are some instances where the registration will not have certain parts written in it; that’s a situation where the Allgemeinen Betriebserlaubnis (a general usage permit) has to be checked. This basically involves looking at a component’s part number and checking to make sure that the part is certified as suitable for the vehicle undergoing inspection.
Here’s a look at the aftermarket parts listed on Tobi’s registration:


On this document are: wheels, wheel spacers, aftermarket springs, stainless steel brake hoses, brake calipers, brake discs and tires.
And yes, you read that right: In order to install aftermarket brake hoses, Tobi legally has to ensure that the part is listed on the registration and that it has been proved safe for his vehicle. The whole thing is absurdly strict and so far from the Swap Lawnmower Engine Into Pickup With Impunity culture in the U.S.
Preparing My Van For The Appointment: Optics Matter

I was so confident.
I had just spent over a month repairing every single faulty part that I could identify on my 1994 Chrysler Voyager. I’d swapped the wheel bearings, the outer CV joints, the brake pads. I’d adjusted the rear brakes, I’d installed new rear shocks. I’d repaired and adjusted the lights. And with the car being relatively rust-free since it resided in Italy most of its life, I felt that I was ready. But to be doubly sure, I conducted a few last-minute touch-ups.
I’ll quote my former army-officer dad when I use the phrase “looking good is being good.” What this means is that you should never underestimate the value of good appearances, and when it comes to the TÜV inspection, it’s a supremely apt expression.
My friends Tim and Tobi — two trained mechanics, the latter having formerly worked as a TÜV inspector — talked me through some of the things I should do to give my van the best chance of succeeding in the inspection. “Grind any rust off the brake lines,” they told me. So I did. Here’s the “before” picture:

And here’s the “after”:

They advised me to fix any obvious corrosion on the vehicle’s chassis. Since the only heavily rusted part under the car was the spare tire hold-down bracket, I ground that down and hit it with black paint:


I also installed the badging on the rear of the van, since the empty, badgeless parts of the hatch looked unfinished and hideous. Now the thing looks great:

I then cleaned out the interior, and at this point the machine was looking good from every angle. The only thing I wanted to do before my appointment was install a new engine mount since the old one was a bit cracked.

As shown in the video toward the top of this article, this proved to be problematic, possibly since the part had been faulty and I had to drill the hole myself — a hole that may have been a bit off-center. Why I chose to do this job immediately before my inspection I’m unsure, because the work took me far longer than it should have, and in my haste, I wrenched so quickly, I actually busted a ratchet.
Still, I got the mount in and hastened to the autobahn (where the van handled beautifully, though the interior did smell a bit like coolant) to a car wash to get the vehicle looking as pretty as possible in order to woo the inspectors.

With the car spotless, a successful autobahn run under its belt and hundreds of euros worth of new parts adorning its chassis, Project Krassler was ready to meet its opponent: The infamous German TÜV.
My Van Failed TÜV Within 10 Seconds

I entered the TÜV office located on the east side of Nürnberg and handed a nice lady the previous owner’s registration paper, my key and 120 Euros. Then I waited.
In short order, a young mechanic strolled over to the parking lot and hopped into my Chrysler. I watched from a distance, hanging out with my friends Andreas, Jens and Tobi, all of whom were there specifically to witness Project Krassler’s very first physical.
Tobi walked over to his former coworker now in the driver’s seat of the car; a few moments later, I drifted toward the two, curious to hear the technician’s initial impression. Tobi saw me, turned, and told me the vehicle had already failed. “What?!” I exclaimed to Tobi, confused. “In the first 10 seconds?”
“Yes, your steering lock appears to be broken. Your column locks even with the key in the ignition,” he responded. I was baffled.
I’d heard that German vehicle inspection was tough, and I knew that my car — with 250,000 miles on the clock — wasn’t going to easily get through it. But I’d put my heart and soul into this machine; I’d done my due diligence, researching, wrenching, inspecting, analyzing. For me to fail immediately seemed like a cruel joke. But in some ways, also a hilarious one. And in fact, one that would become even funnier as the hits just kept piling up.
I wondered to myself why this steering lock thing was an issue. As long as the key is in the “lock” position, isn’t the column going to lock? Since when does the key have to be out for the wheel to lock? I was a bit baffled and deeply concerned. Fixing an ignition cylinder or steering column wouldn’t be easy. Plus, I was already a month in and itching to start my road trip; I didn’t have time for such a repair, especially given the scarcity of Chrysler Voyager parts in Germany.
The test continued with the inspector driving the vehicle onto the rollers to check the brakes.

With the front axle on the spinning drums, I watched the two brake-force dials shown in the picture above rise in unison. The inspector put the vehicle back into first gear and drove until the rear wheels were on the rollers.
The rollers spun up with a whir, and I kept my eyes glued to those two gauges. The right one shot up with vigor, but the left one lagged. “Hmm. I adjusted these. Surely they’re not that far off, right?” I thought to myself.
The operator kept the vehicle in position, running the test multiple times, then checking the park brake. When he kicked the foot-brake, the left wheel’s needle catapulted to above the “2″ position, while the right remained only slightly above “1.”
At the time, I wasn’t sure how this part of the test had gone, but I later learned that not only had my park brake failed by an enormous margin, but my rear hydraulic brakes were also way off. (I’ll provide more details when I show the report later in this story).

Next, the inspector drove the van off the rollers and onto a hoist. He then checked the hazard lights, fog lights, turn signals, reverse lights, and presumably, interior lights. Things seemed fine, but next up was the headlight check, conducted via one of those special contraptions that I mentioned earlier:

This went poorly. Very, very poorly.
Though I had repaired my headlight with epoxy and gotten it to mount nicely, and my friend Tim — a brilliant mechanic — had helped me aim the light, I had made a critical error. The damn car wash.
My friend Tobi notified me that the passenger’s side light had failed the test in an epic fashion. Not only had the light actually come loose from its ball-stud (I think I must have hit a bump and knocked it loose on the way to the shop), but the thing was filled with water from the car wash I’d just gone to.
So the headlight aim was all over the place because the light wasn’t fastened, and the beam pattern was just a giant blur since there was so much water in the lens.
But then came the real disaster.

After failing my inspection within 10 seconds due to an apparently faulty steering column, after my rear brakes and rear parking brake failed, and after my waterlogged and unfastened passenger side headlight failed, my minivan had two more tricks up its sleeve to really ruin my day. First, the driver’s side headlight went really dim for reasons unknown:

But this was the lesser of the two tricks.
For the emissions test, the inspector hooked up a sniffer to the van’s exhaust pipe and put a big exhaust-tube behind the pipe to carry gases away from the garage. Then the technician attached some emissions equipment to the car’s battery and began running the test.

Off to the side, a monitor displayed emissions readings. I glanced at it, hoping that it’d turn from red (fail) to green (pass) as the inspector revved the 2.5-liter turbodiesel engine. The man behind the wheel dropped his foot on the pedal, and the four-cylinder screamed bloody murder.
Gasoline engines revving to 4,500 rpm sound healthy, but trust me when I say that hearing this old, agricultural VM Motori diesel rev like that pained me. I still have nightmares about it. That 250,000 mile powertrain sounded as if it were crying out for help as it was being brutally tortured. The turbodiesel was never meant to rev; it likes making its torque down low. But the inspector forced it to spin up, and the van responded violently.
“CUT IT OFF!” Tobi yelled over a hissing noise blaring from the engine bay. Steam billowed from under-hood, and coolant poured all over the garage floor (see below). The operator turned the key to the off position, and I stood there wondering what the heck had just happened.

“David!” Tobi yelled. “You didn’t install your heater hose!”
As I sat there worrying about if we’d just overheated the most cylinder head crack-prone engine of all time, I recalled a mystery fluid leak on the front subframe. I’d noticed it the day I first saw the van and even after a few test drives the mystery fluid (which, I have to say, looked like coolant) remained right there, pooled in a small spot on my subframe. I never did identify the source of that leak.
But now I knew.

Apparently, the previous owner hadn’t installed a hose clamp over the heater core nipple, so when the operator revved up the diesel engine the water pump pressurized the cooling system and shot the rubber hose right off the nipple, sending gallons of antifreeze directly onto the exhaust manifold and turbocharger, immediately vaporizing much of the liquid.

The good news is that the hot coolant shower had washed pretty much all of the oil off the engine, so it was impossible for inspectors to detect any leaks. The other good news is that, after Tobi poured some water into my coolant bottle, the van actually passed emissions! (This is because the van only has to pass the emission standards in place when it was first registered, and 1994 diesel emissions standards in Germany were absurdly lenient).

On another positive note, as inspectors began the visual-inspection part of the exam on the front axle, the fruits of my month’s worth of labor began showing. The suspension and steering parts were in excellent shape, and the underbody looked rust-free and just downright clean. “This actually looks better than I expected,” Tobi told me the inspector said.

As we scooted around to the rear of the car, I had a few concerns as the inspector prodded around. Tobi, Tim, and I had discussed a few days prior whether or not I should paint my shocks black. See, the issue was that the Blue Monroe shocks I’d imported from the U.S. were a bit too “flashy.”
“Those blue shocks might make the inspector think these are aftermarket,” one of my friends told me. “And if they are aftermarket parts, they have to be in your registration sheet, and they must be approved for this vehicle.” I was concerned because it appears that my van has some kind of suspension lift in the rear, as the factory shocks are about three inches too short. The blue shocks on my vehicle are thus not approved and would fail under any scrutiny.
Luckily, the inspector didn’t even look twice at the dampers (probably because the idea of sport-tuned shocks on a van is laughable), though he did pause at my rear sway bar links, whose bushings are a bit loose (I didn’t tighten then because the bolts that squeeze them into place are seized). But even that he thought was OK.

The inspector then activated the sliding parts of the hoist, which shoved the passenger’s side wheel left and right, flexing the suspension parts. The front plate under the driver’s side wheel also moved laterally, causing the wheels to steer. The technician watched all the suspension parts move as they should. Things here looked good. Thank god.
Score: TUV: 1, David Tracy: 0

So it wasn’t all bad. The visual part of the exterior inspection had gone swimmingly. The suspension, steering and body all looked good. Plus, my driver’s side headlight had decided to wake up, and the inspector gave it a pass. I think out of pity.
But the headlight test otherwise hadn’t gone well. The brake test had been a failure. The steering column issue remained a mystery. And that big coolant spill that sent a cloud of steam into the rafters? Well, that was just annoying, but a fitting lesson for me to never, ever underestimate the TÜV.
Inspectors will check random things like the steering column lock. They’ll precisely measure the brake force at each wheel in kilonewtons and make sure that readings of each wheel on the same axle don’t differ too much from each another. They’ll measure your headlights with a machine for aim, brightness and pattern. And they’ll rev your engine — even your tractor-like diesel — to the sky. TÜV is no joke, and that became clear when I received my report card:

German TÜV inspection is so difficult that there’s only one kind of “pass” and four different types of “fail.” Those include failures due to small defects (Geringer Mangel, GM), more substantial defects (Erheblicher Mangel, EM), dangerous defects (Gefährlicher Mangel, VM), and unsafe-to-continue-driving defects (Verkehrsunsicherer Mangel, VU). Only small defects allow the car’s owner to receive the TÜV sticker, while all other failure types require a retest within a month.
As you can see in the image above, the light aim and pattern, as well as the rear brake and park brake all fell under the “more substantial defect” category, while the steering lock was considered a dangerous defect. You’ll also see that the front brakes measured 330 decanewtons left and 360 decanewtons right. That’s pretty solid balance, but the rear brake at 130 daN left and 170 daN right was a difference of greater than 25 percent, yielding a failure. And the 220 daN left park brake and only 80 daN right park brake was well above the 50 percent difference allowed.
Round Two And Germany’s Chrysler Voyager King
I got straight to work.
As embarrassing as it had been to fail in the first 10 seconds of my inspection, to fail in so many areas and to fill the garage with a plume of evaporated coolant, I didn’t lose hope. After all, as a Michigan resident, I’ve been fixing cars in much worse condition for years (though admittedly, it’s a state with zero vehicle inspection — a fact that that baffled the inspector I spoke with.) What are some brake problems and light problems? These should be easy.
The steering column thing worried me, though. “Why does my steering have to remain unlocked even if the key is in the ‘lock’ position?” I wondered. I began doing some research. I posted on a German Chrysler Voyager Facebook page to get some input:

Some folks told me their steering behaved differently than mine, while still others told me that mine was acting normally. One member of the page named Stefan pointed out the style of ignition switch that I had in my van:

Shown below, many modern European cars have an accessory position between the “on” and “lock” position, while my Voyager’s accessory position is all the way counter-clockwise. What’s more, where some modern Euro cars have their accessory position, the Voyager has an “off” position. Most European cars don’t have this position at all.

I assume the point behind the TÜV check is to make sure that owners can in the case of an emergency turn their car off without losing steering. Maybe, because my van has an “off” position in which the steering will not lock, this allows my van to get away with having the steering lock in the “lock” position even with the key in?
I wasn’t sure of the rationale behind my design, but in any case, I had just determined that my car wasn’t broken. I called up a local American car dealership called Baumann Motors and spoke with a nice “army brat” woman on the phone, who quickly communicated that this is a common issue with German repair shops: They don’t understand that this kind of behavior is totally normal on American-designed cars.
For further proof, I reached out to the German King of Chrysler Voyagers, a man named Tizian from Aachen.

I know what you’re probably thinking: “King of Chrysler Voyagers in Germany? Surely such a person doesn’t actually exist.” But oh, he does. Look at the photo above showing a gathering of Voyager owners that Tizian put together. Oh, and he also started a first and second-generation Chrysler Voyager online forum called classic-voyager.de. And if that’s not enough to convince you that this is the German King Of Chrysler Voyagers, just look at these photos he sent me over Whatsapp:


Look at this woodie in the background!:

And is this a body-side-outer panel on the ground?:

Holy crap, it is!:

Needless to say, expect a full story on Tizian soon. The man has been a helpful resource for me throughout the last few months, and even took a video of himself testing the steering lock on over half a dozen Voyagers:
With Tizian’s videos in hand, information from that American car dealer telling me that my car is fine, and my friend Tobi knowing the inspectors at the TÜV center quite well, we were able to convince the technicians at the inspection station that actually, my steering column problem wasn’t a problem at all. This was a huge relief.
My brake problems and headlight problem remained.


Tobi, kind soul that he is, volunteered to help me get the van back to TÜV as quickly as possible. He suggested we sand down the rear brake shoes and drums, and inspect the hardware. We did that, and then he showed me the right way to make sure the parking brake would activate evenly on both sides.
Instead of spinning the drum brake adjuster screw until each side was dragging a bit (my usual method for ensuring even brake force), he suggested that I press the park brake until one wheel locked. Then I should adjust the screw on the other side to get that brake to lock. Then both sides would be roughly even in terms of brake force.
From there, Andreas suggested that I take a blow-dryer to my headlight to get the water vapor out; I did that and later wiped silicon over the seams to seal the lens housing. Tobi tightened a small clip that held my light onto its ball-stud so it wouldn’t pop loose again.

I also bled my brakes, which was a good call, because brake fluid is supposed to be clear/maybe a little amber colored. It isn’t supposed to be green:

With sanded brake shoes and drums; an adjusted park brake; a dry, well-fastened headlight; and bled brake hydraulics, it was time to head back to TÜV just a day after the disastrous failure.

The headlight passed without issue, and the park brake adjustment had apparently worked well, too. The two needles rose to similar heights, though the left was still a bit stronger:

Unfortunately, my rear hydraulic brakes were still way off.

As you can see, the van still has that rear brake substantial defect (EM) listed. The park brake, at 120 daN right and 220 daN left was barely within the 50 percent delta limit, but the rear hydraulic brake’s 130 daN left and 250 daN right was still way off the 25 percent difference allowed.
Why was this happening? My brake shoes and drums looked fine, and I’d just bled the brakes. I wasn’t sure, but this, to me, meant war. I tore my rear brakes completely apart.

Specifically, I was concerned about the wheel cylinders. Since my parking brake was working well, I knew my shoes and drums were fine. I looked at all the springs and they, too, seemed okay. Something was up with the hydraulic system and, even though I didn’t see any leaks, I suspected there might be a small one somewhere.

Opening up the driver’s side wheel cylinder (the weaker of the two according to my TÜV paperwork) showed some rust. And while I can’t confirm that it’s a product of a brake fluid leak and not just water intrusion into the rubber dust boot, pulling the pistons out of the cylinder revealed blemishes in the cylinder wall. This could compromise the piston seal:

My solution was to sand the inside of both wheel cylinders, reinstall them, put the brakes back together (and readjust them), and then bleed all four brakes for good measure. Then it was time to head back to TÜV for the third time in five days.
Third Time’s The Charm. But Only Barely.

After Thursday’s epic fail and Fridays’ rear hydraulic brake struggles, Monday brought Round Three of Project Krassler vs. TÜV. I was a bit nervous because, at this point, I had done damn near everything I could think of to get those rear brakes working properly. They seemed to have bled well, with no air bubbles in the lines. The shoes and drums looked good. And now I’d sanded the wheel cylinders and was certain they’d seal well enough. My brakes should work.
The inspector jumped into my van and drove its front axle onto the rollers. The big cylinders spooled up and, in short order, the two needles rose almost perfectly in unison, high on the gauges cantilevered from the wall on the left side of the shop. No surprise there.
Then the operator crawled the van forward and tested the rear axle, first beginning with the parking brake which had passed last time, though I’d had to readjust it after tearing into the brakes. Both needles rose again, though again, the left was remained stronger, but it didn’t seem to be too much stronger.
Then the operator moved his foot to the right two pedals, and gradually pressed down as the rollers spun. The two needles crept up together and then dropped. Then they crept up again, and dropped.
It seemed that the operator was running the rear brake test over and over, and I wasn’t sure why. For the front brakes, he did the check once, and all was fine. But with the rears, something seemed afoot. This was confirmed when the inspector pulled the car forward over a pit so he could walk below deck to take a peek at some hardware.

The technician pointed his flashlight beam at the back of my brake drums, then at the brake lines running along the driver’s side unibody rail, and then at the brake junction block at the base of the firewall. He was clearly checking for leaks. I think I saw him shake his head once or twice.
“Oh crap, this is bad,” I concluded. If my brakes worked, he wouldn’t have to run the test over and over, and he definitely wouldn’t have to poke around underneath the car.
The mechanic stood below ground with a flashlight, peeking at the underbody what seemed like an eternity. Then finally, after some of the most agonizing three minutes of my life, the man emerged from the depths with a disappointed look on his face.
“So, was everything good?” my friend Jens asked in a chipper tone to a man who was obviously very much not-chipper. “Oh, definitely not good.” the man said.
“But good enough?…” Jens inquired, almost as if to use his optimism to force the man to break from his clearly unhappy state.
With a defeated scowl on his face, it seemed to me as if the inspector had no choice but to admit that, technically, according to the numbers, the van had indeed passed, even though there was clearly something wrong with the brakes — something the technician couldn’t quite identify. “I guess it’s technically good enough,” he muttered in a defeated tone before begrudgingly handing Jens the stamped TÜV paper.

The document showed that the parking brake was reasonably well-balanced, and now the rear hydraulic brake was also well within spec at 110 daN left and 140 right. The left brake’s stopping force hadn’t gone up much since the last test, but the right brake’s had dropped quite a bit, bringing it close to the left brake’s figure. I’d have preferred the weaker brake to have gotten stronger, but this will work.

Yeehaw!! I was absolutely thrilled.
Somehow, after over a month of wrenching; after hundreds of euros in new parts including new tires, new wheel bearings, new CV joints and far too many other bits to mention; after three attempts at the inspection station; after way too many discussions with my mechanic friends about what I had to do to pull this off, I had done it. With the help of some great people, I’d gotten a 250,000 mile, $600 van that I’d bought sight-unseen through one of the most grueling mandatory vehicle inspections on earth.

With the TÜV report in hand, I could now register the car, get that beautiful round orange sticker shown above and drive my van legally on German roads. In fact, that’s what I did just a few days later (and for the record, the brakes feel great, even if the rears don’t quite make as many kilonewtons of braking force as the inspector may have liked. I’ll keep an eye on it), and today I’m on the verge of embarking on a European road trip whose chance of success without a significant failure is the same as the limit of 1/x as x approaches infinity. (That’s zero, for you non-math-nerds).
But no matter, I’m going for it anyway. I’ll provide details on this Van Life *Voyage* I have planned soon, as well as the one problem that I think will likely leave me stranded on the side of the road in The Middle of Nowhere, Sweden. Also, the coronavirus travel restrictions are insanely complicated. More on that soon. Until then, follow my Instagram for updates.