
I recently decided to do something outside my normal routine: Restore a vintage nitro-powered remote control car. I learned a lot more about vehicles than I expected to.
At 1/10 the scale, these hobby-grade R/C vehicles are actually quite mechanically similar to their full-sized counterparts. Working on nitro-powered R/Cs is not exactly new to me; in fact, I owe my fundamental wrenching knowledge to these small, intricate pieces of engineering.
Growing up in the late ‘90s and into the early 2000s, I was big into racing and repairing these things. Everything from rebuilding the two-stroke engines to reviving worn-out suspension components was hashed out during my tenure with these little cars.
It might sound silly, but restoring an old R/C car can help build your understanding of the mechanical systems in real cars. The process can also hone your mechanical troubleshooting and problem solving skills. When undertaking a small-scale restoration, there isn’t the huge financial cost, nor the storage and work space issues that come with working on real cars. And, at the end of it all, you’ll likely have the confidence to take on a project that is a little more full-scale.
Advertisement
Alright, enough talk. I’m going to show you what restoring a classic nitro R/C is all about.
Finding The Right Candidate
It’s been more than a decade since I last owned a nitro R/C. The hobby that I attribute most of my mechanical skills to was placed on the back burner while school and life unfolded. Getting back into the hobby took more work than I had anticipated – pretty much all the models I was familiar with back in the day had long since gone out of production.
Advertisement
I’ve always had a soft spot for “on-road” style R/Cs which are low to the ground and pay homage to real-life vehicles. There was one particular model that I always wanted in my youth that fell into this particular “on-road” class. The R/C magazines I subscribed to at the time always ran advertisements for it. The bodies they offered for the chassis were highly-detailed scale replicas of iconic cars of the era.
The chassis was the Kyosho PureTen GP Spider MK II. The manufacturer, Kyosho, organized a “World Cup” racing series for this particular chassis back in the day. Because of this, they offered a special edition of the chassis called the “World Cup,” which came with all sorts of upgrades like a two-speed transmission, anti-roll bars, a carbon upper chassis plate and a special blue anodized main chassis plate. I didn’t have the funds to get one back then, so of course this meant it was the version I just had to get my hands on now.
Advertisement
After months of scouring eBay, a used Kyosho Spider World Cup chassis finally came up for auction. It was in a partially disassembled state, but it looked relatively complete. “Relatively” is the key word here because spare parts are difficult to locate nowadays, and they’re expensive when you do find them. Like most rare vehicles, getting a complete example is worth its weight in gold. But, in this case, I was just happy to find an example at all.
I was prepared to make a questionable financial decision in order to win the auction. I threw in my maximum bid and waited for the last minute to tick by. While the bidding was lively at first, it stalled out at the end and I found myself the winner of a vintage Kyosho Spider World Cup.
Advertisement
Parts Acquisition
When I received the car, I quickly saw I didn’t have all the parts needed to get it into a running state. Surprises such as this are the name of the game when you buy something sight-unseen. Thanks to the fact that this model went out of production nearly two decades ago, finding parts was going to be a challenge. This is an all too common reality for anyone who has ever taken on a restoration of a somewhat obscure vehicle – no matter the size. So, with that, my search for unobtanium parts commenced.
I spent a little over a month combing eBay worldwide before I located all the necessary spares. Nothing was cheap, but when there is only one of a particular part for sale, almost any price seems reasonable.
Advertisement
Notice how I said “almost” any price. I nearly let nostalgia get the best of me while doing some late night bidding for a brand new, World Cup-spec chassis plate. The chassis plate on my car was scratched up from regular use, and new chassis plates are impossible to find.
I bid the auction up over $170 before I was hit with a reality check. “What are you doing?!” snapped my conscience. Luckily for me, there was someone crazier who outbid me at the last moment. They wanted it – no – theyneeded it worse than I did. Oh well.
Advertisement
It was about three weeks before the parts sourced from the dark and musty back rooms of old hobby shops across the world landed at my front door. I now felt that I could successfully revive the R/C of my childhood dreams.
Advertisement
Engine Repairs
The first item I needed to attend to was rebuilding the car’s nitro-powered engine. These engines are fairly simple as far as internal combustion power plants go, but you can still gain a lot of general mechanical knowledge from working on them. The engine that came with my car had seen better days. Nitro engines rev to the stratosphere (around 30,000 RPM, sometimes more) and eventually the internal parts just can’t take the stress anymore.
Advertisement
It appeared that the connecting rod failed on the engine, which then took the crankshaft out with it. The crankcase, piston, and other components seemed to have made it out unscathed. I was able to locate a new crankshaft, connecting rod, and head gasket in an effort to resuscitate the little guy. Everything went back together without much fuss which was a welcome relief.
Advertisement
In an attempt to make the engine look more cosmetically pleasing, I decided to the grind away all the scratches that were on the top of the engine’s heat sink. I then repainted the piece with some clearish-blue spray paint which simulated the original anodized finish. I think it came out looking decent, especially since I couldn’t simply go out and buy a new part.
The next order of business was to give the carburetor a good looking-over. There are various small passages, needles, and o-rings that needed cleaned and inspected since it had been years since its last use. It doesn’t take much old fuel to thoroughly gum up a small carburetor like this. Luckily, a simple clean was all it took to return the carburetor to like-new status.
Advertisement
Clutch System
In order to transmit power from the engine’s crankshaft to the car’s drivetrain, a clutch is required. This R/C car utilizes a centripetal clutch system similar to what you would find in many lawn and garden implements. Spring-loaded clutch “fingers,” which are attached to the engine’s flywheel, swing outward as the engine RPM climbs.
Advertisement
As the clutch fingers swing outward, they strike the clutch “bell.” The clutch bell is in constant contact with the car’s drivetrain. As the clutch fingers contact the bell, the bell effectively becomes “one” with the engine’s crankshaft, which results in the engine powering the car’s drivetrain. It’s a simple system that is quite effective.
Unfortunately, the clutch system wasn’t included with the chassis I bought. This would prove to be a costly hurdle to put right as the system is specific to this particular car. Thankfully, I was able to reconstruct the clutch system by cobbling together various original and aftermarket parts – basically whatever was available for purchase, which wasn’t much.
Advertisement
I had to do a little bit of modification, but in the end I had a clutch system that was ready to handle the power transferring duties. Result!
Exhaust System
The exhaust system that came with the car was battle scarred, heavily dented and basically unusable. I was able to locate a brand new “tuned” performance exhaust that was exactly like the one that would have come with the car originally.
Advertisement
The exhaust utilizes a dual-chamber construction which aids the little two stroke engine in making power at both the low and top end of its rev range. The system consists of a header which bolts up to the engine’s exhaust port, and a silencer which is secured to the header via a silicone coupler. Installing this new piece really helped freshen up the look of the chassis.
Suspension & Tires
Suspension and tires are critical components when it comes to the handling performance of any vehicle, including small ones like this. This R/C utilizes a fully independent, double control arm design that allows for a great level of tune-ability. The car also uses coilover-style shocks, which are made of aluminum and are coated with Teflon to reduce friction where the internal damper piston rides against the shock body.
Advertisement
Inside of the shock body is silicone oil which controls the shock’s damping action. The shock oil probably hadn’t been touched in at least a decade, so changing it out for new seemed like a good idea. Simply unscrewing the top of the shock gets you to the oil where you’ll also see the damper rod, piston, and o-ring seals. It’s fun to see the level of detail that goes into these things – their construction is fundamentally just like the real thing. With new oil poured in and all air bubbles bled from the shock, the shock cap could be screwed back on. And just like that, the shock’s damping action was renewed.
Advertisement
The tires, which came with the car, still needed to be properly mounted to the wheels. A foam ring must be inserted between the tire and the wheel to create a simulated air filling. Different foam compounds are available to make the tire more rigid or soft. After inserting the foam, the tires then needed to be glued to the wheels with a super glue-like adhesive. With that all done, the tires were ready to roll.
Drivetrain Refresh
This R/C utilizes a belt-and-pulley operated four-wheel drive system. The belts are similar in design to what you might find on some belt-drive motorcycles. Each end of the car has a differential that distributes power to the wheels in a controlled fashion. The differentials are packed with grease, and like the shocks mentioned above, I had to assume this internal filling was long past its use-by date.
Advertisement
Pulling the differentials out of the car required a moderate amount of chassis disassembly, but once they were out, it was straight forward to replace the grease. Four small screws are all that keep the two differential halves together. Once separated, it was just a matter of cleaning the internal bevel gears and squirting some new grease inside. The differential actuation is now buttery smooth.
Advertisement
The belt-and-pulley drivetrain uses vertical chassis bulkheads in order to suspend the pulley driveshafts. These bulkheads also help create rigidity throughout the chassis. During my hunt for spare parts, I came across a new-in-package aluminum bulkhead for sale that looked absolutely beautiful. This piece was an option part made by Kyosho back in the day and it is a rare find today.
Advertisement
Fitting the aluminum bulkhead would not only keep a highly stressed portion of the drivetrain flex-free, but it would also significantly improve overall chassis stiffness. Oh yeah, and it looks pretty trick too – that’s a win-win in my book.
Electrical System
Even though this R/C car is nitro powered, it still has an onboard electrical system to handle the “radio controlled” part of the operation. The steering, throttle, and brake controls are actuated by little electric motors called servos. The servos are given input commands from the handheld controller by way of a receiver. The whole electrical system is powered by a small six-volt rechargeable battery pack.
Advertisement
Routing the wires through the chassis for all this equipment is always a time consuming, guess-and-check style operation. Setting up the servos so that they are trimmed properly often involves translating a cryptic radio controller user interface. It is reminiscent of doing an aftermarket radio installation on a real car. There are a lot of wires going on, there’s an abundance of hard-to-follow written instructions, and there’s very little room to work. Good times!
Advertisement
When it came to controller duties, I decided to buy a period-correct Futaba 3PJS radio controller – this was the radio I always wanted back in the day. I was relieved to find that I could up-fit the radio controller with a modern 2.4 GHz transmitter module. Unlike the old days where your radio system had one specific frequency channel, which could lead to disaster if someone else in the area was using the same frequency, the new 2.4 GHz system allows the radio to “hop” frequencies so that you always remain in control no matter how many other radios are in the area. It’s always neat when you can keep old equipment current with modern technology.
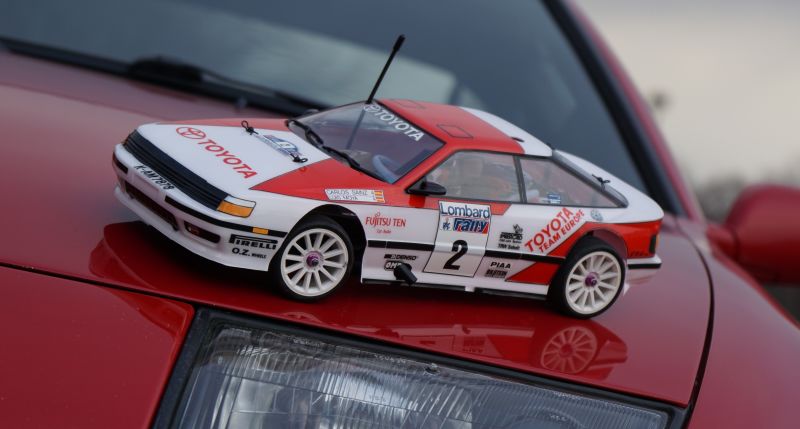
Body
The final stage of this R/C restoration revolved around a bit of bodywork. The Toyota Celica body you’ve seen in the preceding photos did not come with the chassis—it had to be sourced separately. The bodies for 1/10 on-road cars are made from a thin polycarbonate plastic colloquially known as “Lexan.” While there are a lot of different bodies to choose from, not all are made with the high level of detail as the original Kyosho Spider bodies. Unfortunately, you can’t get the original bodies anymore, but there does happen to be a manufacturer that’s still cranking out products that are highly detailed: Tamiya.
Advertisement
My search for the perfect profile came to a half when I came across the Tamiya-made Toyota Celica rally car body—I thought it looked the business. However, one downside was that it was designed to fit an electric on-road car, which is about a centimeter narrower than my nitro-powered car. I had to sacrifice some of the body’s scale appearance by enlarging the wheel wells so that the car’s suspension could articulate properly without encountering too much interference with the body.
Advertisement
R/C bodies arrive unpainted and require an intricate masking job in order to get the windows to come out clear and the painted racing livery to come out precise. If you can successfully manage to crisply mask an R/C body, then performing a painted spot repair on a real car will be a piece of cake.
After masking off all the necessary areas, special polycarbonate paint is then applied to the inside of the body with numerous light dustings. Once the paint is down, it’s time to start the real fun of applying decals. Decals are basically heavy-duty vinyl stickers which need to be cut out individually and applied with a steady hand. It’s tedious work, but the end result makes it all the more worth while. Assuming everything goes to plan, you’ll end up with a fairly convincing 1/10 scale model of a real car.
Advertisement
Shakedown & Tuning
So, after all that restoration work, does the car actually run? Well, determining that fact is the climactic part of the revival process. Just like when working on a real car, the job is not over until you can prove the time, labor, and money spent were worth it.
Advertisement
I splashed some fresh nitro fuel into the tank, primed the fuel lines, and placed the glow plug igniter atop the engine. You start this engine in a similar fashion as you use when starting a lawn mower – by pulling a cord. After a few pulls of the starter, the engine sprang into life and then immediately died. I knew that the carburetor settings would need some adjustment since I had just torn the whole thing apart.
Advertisement
Getting these small nitro engines to run properly can be frustrating when first starting out. However, it provides an excellent environment to learn the basics of fuel and air mixture tuning, a critical metric of any internal combustion engine. After about half an hour of messing with the carburetor needle settings, the engine was running perfectly. It had a steady idle, a responsive low end and a powerful, singing top end. Even when working with something this small, there’s a great sense of accomplishment when you get an engine purring like it should.
Starting Small
I had forgotten just how fast these little cars are. Since this chassis is equipped with a two-speed transmission, it accelerates with a blistering pace and has no problem exceeding the posted residential speed limit. A light touch at the steering controls and a good amount of spatial awareness is required to keep this thing from hitting something stationary while at speed. Even still, the fun of piloting the car was well worth the tradeoff of the time and money spent reviving it.
Advertisement
Restoring a vintage nitro-powered R/C may not be a surefire learn-to-wrench strategy for everyone. But, for me, working on these R/Cs has proven to be a valuable stepping stone for taking on projects that are more full-sized. As I’ve found out, rescuing an old nitro-powered remote controlled car can be just as rewarding—and often as challenging—as restoring the real thing.
Advertisement
Peter Monshizadeh is the Practical Enthusiast. He writes about successful wrenching projects, big and small.